Welcome to the GSXC7 installation manual, your comprehensive guide for installing the Goodman GSXC7 system. This manual ensures safe and proper installation, covering technical specifications, safety precautions, and step-by-step instructions to achieve optimal performance and reliability.
Overview of the GSXC7 System
The GSXC7 is a high-efficiency air conditioning and heating system designed by Goodman, offering reliability and performance for residential and light commercial use. It features advanced components, including a scroll compressor and durable construction, ensuring long-lasting operation. The system is known for its energy efficiency, quiet performance, and versatility in various climates. With a range of tonnage options, the GSXC7 can be tailored to meet different cooling and heating needs. Its compact design allows for flexible installation, making it suitable for both new constructions and retrofit projects. The GSXC7 is a popular choice among HVAC professionals and homeowners due to its balance of quality, affordability, and functionality.
Importance of Proper Installation
Proper installation of the GSXC7 system is crucial for optimal performance, efficiency, and safety. Incorrect installation can lead to reduced efficiency, increased energy costs, and potential safety hazards. It ensures compliance with manufacturer guidelines and local building codes, guaranteeing reliability and longevity of the unit. Improper installation may result in voiding the warranty, system malfunctions, or even premature failure. Correct installation also ensures proper airflow, refrigerant levels, and electrical connections, which are vital for the system to operate as intended. By following the manual, you can avoid common issues like overheating, icing, or noise problems. Proper installation safeguards the investment in your HVAC system and ensures it meets your comfort and energy-saving expectations.

Pre-Installation Requirements
Ensure the site is prepared, and all necessary tools and materials are available. Verify compatibility and compliance with local regulations for a smooth installation process.
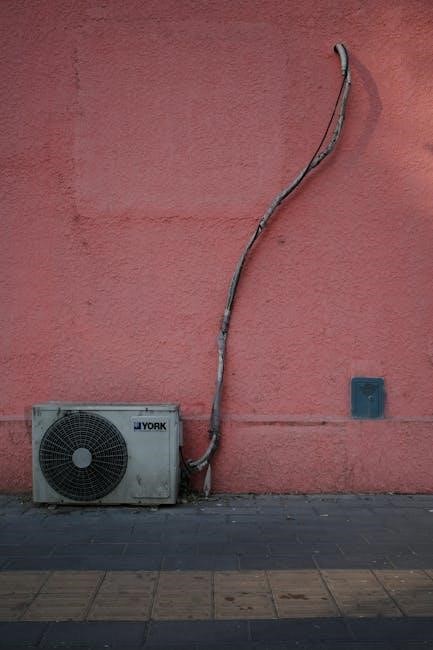
Site Preparation for the GSXC7
Proper site preparation is crucial for the successful installation of the GSXC7 system. Begin by selecting a suitable location for the outdoor unit, ensuring it is level, well-ventilated, and clear of debris. The area should be free from obstructions to allow proper airflow. For the indoor unit, choose a location that provides easy access for maintenance and ensures even air distribution throughout the space. Ensure the ground is stable and can support the weight of the outdoor unit. If necessary, install a concrete pad or base to provide a solid foundation. Additionally, verify that all necessary utilities, such as electrical connections and drainage, are accessible and properly prepared before proceeding with the installation.
Necessary Tools and Materials
For a successful GSXC7 installation, gather essential tools and materials. You will need a drill press, hole saw, screwdrivers, pliers, a multimeter, wrenches, and a spirit level. Additionally, ensure you have insulation, vacuum hoses, and copper tubing for connections. Electrical supplies like wires, connectors, and circuit breakers are also required. Proper fasteners, brackets, and sealing materials are crucial for securing and insulating the units. These tools and materials ensure a smooth, efficient, and safe installation process, preventing potential issues and ensuring optimal system performance. Always refer to the manufacturer’s guidelines for specific requirements to guarantee longevity and reliability of the GSXC7 system.
Installation Process
Follow the GSXC7 manual for a seamless installation process. Ensure correct unit placement, secure connections, and proper sequencing to avoid operational issues. Reference technical specifications carefully.
Step-by-Step Guide for Outdoor Unit Installation
Site Preparation: Ensure the outdoor unit is placed on a flat, stable surface, away from obstructions and direct sunlight. Clear the area of debris and vegetation.
Leveling the Unit: Use a spirit level to ensure the outdoor unit is perfectly horizontal. Adjust the mounting pad or base if necessary to maintain balance.
Mounting the Unit: Secure the outdoor unit to the mounting brackets or pad using the provided hardware. Tighten all bolts firmly to prevent vibration.
Refrigerant Line Connection: Connect the refrigerant lines to the outdoor unit, ensuring they are properly insulated and sealed to avoid leaks.
Electrical Connections: Refer to the manual for specific wiring requirements. Connect the power supply and ensure all connections are secure and meet safety standards.
Final Checks: Test the outdoor unit to ensure proper operation before proceeding with the indoor unit installation.
Step-by-Step Guide for Indoor Unit Installation
Begin by carefully unpacking and inspecting the indoor unit for any damage. Mount the unit in a level, secure location, ensuring proper drainage and accessibility for maintenance. Connect the refrigerant lines to the designated ports, following the manufacturer’s guidelines. Install the drain line, ensuring it slopes downward to prevent water accumulation. Next, connect the electrical wires, paying attention to the wiring diagram in the manual. Secure all connections tightly and double-check for leaks or loose fittings. Finally, power on the unit and test its operation to ensure proper function. Always refer to the GSXC7 installation manual for specific details and safety precautions.
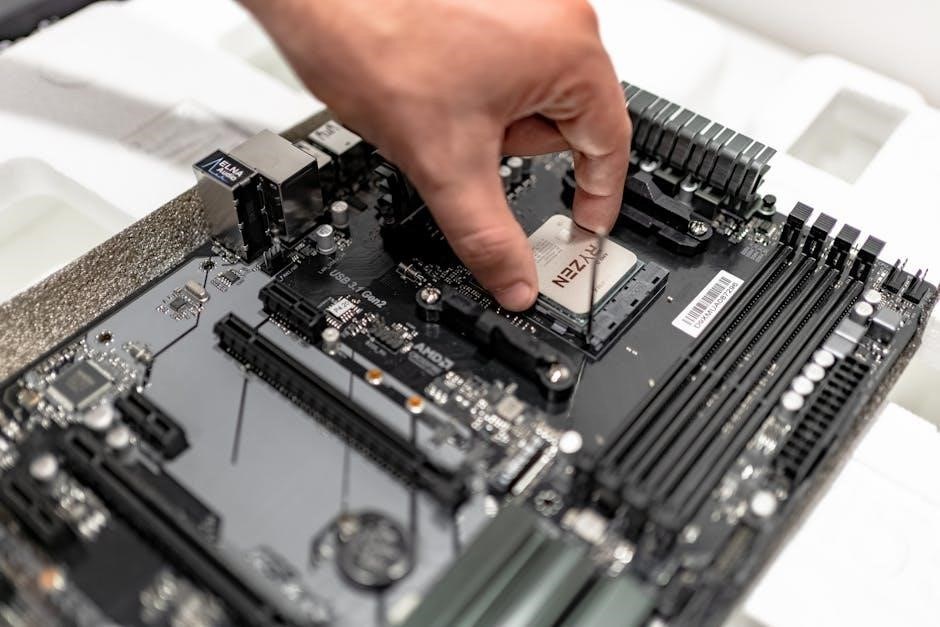
Wiring and Electrical Connections
Ensure safe and correct wiring by following local codes, using correct voltage, proper wire gauge, and secure connections. Verify grounding for safety and efficiency.
Connecting the Outdoor and Indoor Units
To connect the outdoor and indoor units of the GSXC7 system, begin by ensuring all necessary wiring and refrigerant lines are properly prepared. Use the provided communication cable to establish a connection between the units, ensuring it is securely fastened to avoid damage. Next, connect the refrigerant lines, making sure they are tightly sealed to prevent leaks. Finally, power both units and verify communication by checking the LED indicators or control panel. Proper connection is critical for system functionality and efficiency, so double-check all connections before proceeding to the next steps.
Ensuring Proper Electrical Safety
Ensuring proper electrical safety is critical during the installation of the GSXC7 system. Always disconnect power supplies before starting work to prevent electrical shocks or injuries. Use appropriately rated circuit breakers and verify that all wiring matches the system’s specifications. Grounding the unit correctly is essential to avoid electrical hazards. Refer to Goodman’s guidelines for specific voltage and current requirements. Never bypass safety features or use damaged cables. If unsure, consult a licensed electrician to ensure compliance with local electrical codes and standards. Proper electrical connections are vital for the system’s performance and longevity, as well as the safety of the installation team and end-users. Always follow manufacturer recommendations and safety protocols.

Post-Installation Steps
Post-installation steps ensure your GSXC7 operates efficiently. This section covers testing, commissioning, and final checks to verify performance and safety, ensuring a reliable system operation.
Testing the System for Optimal Performance
After installation, power on the system and verify operation. Check the display for error codes and ensure all functions work correctly. Test refrigerant levels and airflow to confirm they meet specifications. Inspect electrical connections for tightness and proper voltage. Run the system in both cooling and heating modes to ensure smooth operation. Monitor drainage and condensate flow to prevent blockages. Perform a leakage test on refrigerant lines to ensure system integrity. Finally, review all safety features to guarantee they are functioning as intended. These steps ensure the GSXC7 operates efficiently and reliably, providing optimal performance for years to come.
Commissioning and Final Checks
Commissioning and final checks are critical to ensure the GSXC7 system operates efficiently and safely. Begin by verifying all electrical connections and refrigerant levels. Test the system under various operating modes to confirm proper functionality. Check for any leaks in the refrigerant lines and ensure proper drainage. Inspect the outdoor and indoor units for correct installation and alignment. Validate thermostat settings and verify airflow balance across all vents. Perform a comprehensive system test to ensure optimal performance, energy efficiency, and compliance with manufacturer specifications. Record all findings and address any issues before finalizing the installation.
- Verify electrical connections and refrigerant levels.
- Test system operation under different modes.
- Inspect for leaks and proper drainage.
- Ensure correct unit installation and alignment.
- Validate thermostat settings and airflow balance.

Troubleshooting Common Issues
Diagnose and resolve common installation-related issues such as wiring problems or refrigerant leaks. Follow the manual’s guidelines for detailed troubleshooting steps and effective solutions to ensure optimal performance.
Diagnosing and Resolving Installation-Related Problems
Identifying and addressing installation issues early ensures optimal performance. Common problems include improper refrigerant levels, loose electrical connections, or misaligned components. Start by checking the power supply and verifying all connections. If the system fails to power on, inspect the circuit breaker and wiring. For cooling issues, ensure proper refrigerant charge and check for leaks. Use diagnostic tools to identify error codes, referencing the manual for solutions. Always follow safety protocols when troubleshooting. If unresolved, consult a certified technician to prevent further complications. Regular post-installation checks can prevent such issues, ensuring the GSXC7 operates efficiently and reliably.