
EZ Wiring Harnesses simplify vehicle rewiring, offering a labeled, GM-based system. Installation involves discarding unnecessary plugs and careful wire routing, often requiring multimeter verification for Ford vehicles.
What is an EZ Wiring Harness?
An EZ Wiring Harness is a complete wiring solution designed to replace a vehicle’s often-deteriorated or modified factory wiring system. Unlike vehicle-specific harnesses, EZ Wiring typically utilizes a universal GM-based harness, providing broad applicability across various makes and models. This means users often need to identify and discard connectors not required for their specific application.
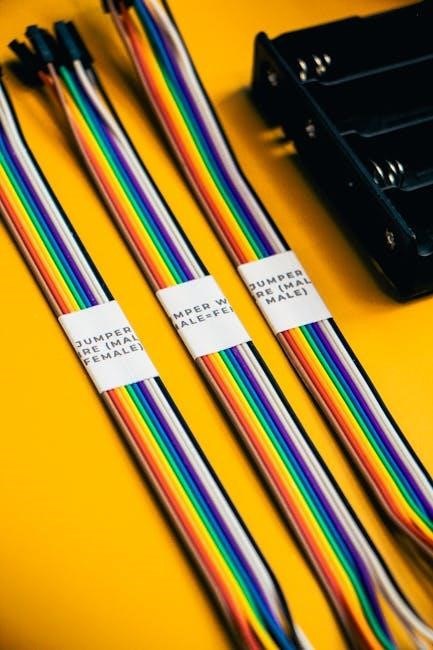
A key feature is the extensive labeling of each wire at frequent intervals, aiding in correct connection during installation. However, due to differences in manufacturer wiring schemes – particularly with Ford vehicles – careful verification with a multimeter is often necessary. The harness aims to streamline the rewiring process, but requires diligent attention to detail and potentially some customization.
Benefits of Using an EZ Wiring Harness
EZ Wiring Harnesses offer several advantages for vehicle rewiring projects. The pre-labeled wires significantly reduce confusion and simplify the installation process, saving time and minimizing errors. Utilizing a GM-based harness provides a readily available and often more affordable alternative to sourcing original equipment manufacturer (OEM) parts.
Furthermore, the universal design allows for customization, making it suitable for modified vehicles or those undergoing significant electrical upgrades. While requiring some adaptation for specific vehicles like Fords, the clear labeling and comprehensive wiring scheme ultimately contribute to a cleaner, more reliable electrical system. Budget-conscious restorers often choose EZ Wiring for its cost-effectiveness compared to Painless Wiring.
Understanding the Components
EZ Wiring Harnesses include a fuse block, main circuit wiring, and clearly labeled wires for easy identification during installation and vehicle-specific adaptations.
Fuse Block and its Placement
The fuse block is a central component of the EZ Wiring Harness, providing circuit protection for all connected accessories. Instructions typically recommend mounting it on the driver’s side, though installers often adapt this based on vehicle layout and personal preference. Proper placement ensures easy access for fuse replacement and minimizes wiring distances.
Careful consideration should be given to mounting surface selection, avoiding areas prone to heat or moisture. Secure mounting prevents damage from vibration during vehicle operation. The fuse block’s location directly impacts the routing of the main wiring harness, so planning is crucial. Always consult the specific harness instructions for recommended mounting points and fuse specifications.
Main Circuit Wiring Harness Overview
The main circuit wiring harness forms the backbone of the EZ Wiring system, distributing power from the fuse block to various vehicle circuits. It’s pre-wired with labeled wires, simplifying connections for headlights, wipers, ignition, and other essential functions. Harnesses are often designed with a universal approach, requiring adaptation for specific vehicle models, particularly Fords, due to differing switch configurations.
Understanding the harness layout is key; diagrams illustrate wire destinations. The harness typically includes wires for power, ground, and switched circuits. Careful routing is essential to prevent chafing and ensure reliable operation. Referencing the included manual and utilizing a multimeter during installation are highly recommended for accurate connections.
Key Wire Labels and Identification
EZ Wiring Harnesses prioritize ease of installation through comprehensive wire labeling. Each wire is typically labeled every few inches, clearly indicating its intended function – for example, “Headlight Power,” “Wiper Motor,” or “Ignition Switch.” This labeling system significantly reduces guesswork during the wiring process. However, remember that the harness is often GM-based, necessitating careful matching to Ford-specific components.
Despite the labeling, verifying connections with a multimeter is crucial, especially when interfacing with vehicle-specific switches. Understanding the color-coding scheme, as detailed in the EZ Wiring documentation, further aids in accurate identification. Proper identification prevents incorrect connections and potential electrical issues.
Installation Process
Installation begins with vehicle preparation, mounting the fuse block, and carefully routing the main wiring harness, following the provided EZ Wiring instructions closely.
Preparing the Vehicle for Installation
Before starting, disconnect the vehicle’s battery to prevent shorts. Thoroughly inspect the existing wiring, noting any damage or modifications. Remove the old harness carefully, labeling wires if needed for reference – though the EZ Wiring system aims to replace it entirely.
Clean the mounting areas for the fuse block and harness, ensuring they are free of debris. Plan the routing path for the main wiring harness, considering accessibility and protection from heat or moving parts. It’s beneficial to have a clear idea of where each wire will terminate before beginning the installation process, streamlining the overall procedure. This preparatory step is crucial for a smooth and successful rewire.
Mounting the Fuse Block
Securely mount the fuse block in a readily accessible, yet protected location. Many installers choose the driver’s side, but consider your vehicle’s layout. Ensure the mounting surface is clean and stable to prevent vibrations. Use appropriate hardware – screws or bolts – suitable for the vehicle’s body material.
Double-check that the fuse block is positioned to allow for easy access to fuses and relays for future maintenance. Avoid areas exposed to direct moisture or extreme temperatures. Proper mounting is vital for a reliable electrical system. Route the main power wire directly from the battery to the fuse block, using a properly sized fuse for protection.
Routing the Main Wiring Harness
Carefully route the main wiring harness, following the vehicle’s existing wiring channels whenever possible. This minimizes the risk of damage from moving parts or sharp edges. Secure the harness with zip ties or clamps every 12-18 inches to prevent sagging and vibration. Avoid running wires near exhaust components or fuel lines.
Pay close attention to wire bends; avoid sharp angles that could stress the wires. Maintain adequate clearance between the harness and any potential pinch points. Refer to the EZ Wiring diagram for specific routing instructions tailored to your vehicle. A well-routed harness ensures a clean installation and reliable performance, reducing potential issues.

Connecting the Wiring
Connect the EZ Wiring harness to the ignition, headlights, and wipers, noting Ford’s differing switch requirements; a multimeter confirms correct connections for optimal function.
Ignition Switch Connection
Connecting the ignition switch with an EZ Wiring Harness often necessitates replacing the original, particularly if it’s deteriorated, as experienced by some users. The harness provides dedicated wires for ignition functions, but careful attention is crucial due to Ford’s unique wiring configurations.
Identify the correct wires from the EZ harness designated for ignition power, accessory, and start functions. Match these to the corresponding terminals on the new or existing ignition switch. Double-check the wiring diagram included with the harness.
Utilize a multimeter to verify continuity and proper voltage at each connection before fully securing the wires. Incorrect connections can prevent starting or cause electrical damage. Secure connections with quality crimp connectors, ensuring a firm and reliable bond.
Headlight Switch Connection
Connecting the headlight switch requires meticulous attention, as Ford vehicles frequently employ different wiring schemes compared to the GM-based EZ Wiring Harness. The harness provides labeled wires for headlight, parking light, and dimmer functions, but compatibility isn’t always direct.
Carefully consult the EZ Wiring diagram and compare it to your vehicle’s original headlight switch wiring. Identify the corresponding wires for each function. A multimeter is invaluable for verifying correct connections, especially when discrepancies arise.
Ensure secure crimp connections and proper insulation to prevent shorts. Test the headlight switch functionality – high beams, low beams, and parking lights – after connecting to confirm correct operation before fully finalizing the installation.
Wiper Switch Connection
Integrating the wiper switch with an EZ Wiring Harness often presents challenges due to Ford’s unique wiring configurations. The harness provides dedicated wires for wiper speed control, washer function, and intermittent operation, but direct matching isn’t guaranteed.
Thoroughly examine the EZ Wiring diagram alongside your vehicle’s original wiper switch wiring. Use a multimeter to pinpoint the corresponding wires for each function – low speed, high speed, park, and washer pump. Pay close attention to any variations in color coding.
Securely crimp all connections and ensure adequate insulation. After connecting, test all wiper functions, including the washer pump, to verify correct operation before completing the installation.

Dealing with Vehicle-Specific Differences
Vehicle variations, particularly with Ford models, necessitate careful wire identification and multimeter verification when using an EZ Wiring Harness for accurate connections.
Ford Wiring Variations
Ford vehicles often present unique challenges during EZ Wiring Harness installation due to differences in switch configurations – specifically, headlight, wiper, and ignition switches. Unlike General Motors systems, Ford utilizes distinct wiring schemes requiring meticulous attention to detail. The provided harness is fundamentally GM-based, meaning adapters or modifications are frequently needed to interface correctly with Ford components.
A multimeter becomes an indispensable tool for verifying each connection, ensuring proper functionality and preventing electrical issues. Simply relying on wire colors can be misleading. Thorough testing is crucial to confirm that each circuit operates as intended, especially when dealing with Ford’s specific wiring protocols. Patience and careful validation are key to a successful installation.
Using a Multimeter for Verification
A multimeter is essential for confirming the accuracy of connections during an EZ Wiring Harness installation, particularly when adapting to vehicle-specific wiring like Ford systems. Don’t solely rely on wire colors; always test for continuity and proper voltage. Begin by verifying power to the fuse block and then check each circuit individually.
Test ignition, headlight, and wiper switch connections to ensure they activate their respective systems correctly. Use the multimeter to confirm grounds are solid and free of resistance. This proactive verification process identifies incorrect connections before potential damage occurs. Careful testing prevents shorts, blown fuses, and frustrating troubleshooting later on, guaranteeing a reliable and safe wiring setup.

Troubleshooting Common Issues
Common problems include incorrect connections, fuse block malfunctions, and grounding issues. Verify all connections with a multimeter and inspect the fuse block thoroughly.
Identifying Incorrect Connections
Incorrect wiring is a frequent issue during EZ Wiring harness installation, particularly when adapting to Ford vehicles due to differing switch configurations. A multimeter becomes your most valuable tool; systematically check each connection against the EZ Wiring diagram. Focus on ignition, headlight, and wiper switches, as these often require careful matching.
Begin by verifying power and ground connections. If a circuit isn’t functioning, trace the wire back to the fuse block, ensuring the fuse is good. Remember the harness is GM-based, so Ford-specific components may need adaptation. Double-check wire colors and labels, and don’t hesitate to revisit the instructions multiple times. Careful, methodical testing is key to resolving connection errors.
Addressing Fuse Block Problems
Fuse block issues can quickly halt progress during an EZ Wiring harness installation. Begin by confirming the fuse block is securely mounted, typically on the driver’s side, as recommended in instructions. Inspect all fuse connections, ensuring each fuse is the correct amperage for its corresponding circuit. A loose connection or blown fuse is often the culprit.
If fuses repeatedly blow, investigate for short circuits in the wiring. Carefully examine the wiring for pinched or damaged insulation. Use a multimeter to test for continuity between the wire and ground. Ensure all connections are clean and tight. Remember to disconnect the battery before troubleshooting any electrical issues within the fuse block.
Resolving Grounding Issues
Poor grounding is a frequent source of frustration when installing an EZ Wiring harness. Ensure all ground wires are connected to clean, unpainted metal surfaces on the vehicle’s chassis. Multiple grounding points are often preferable to a single, heavily loaded connection. Verify the tightness of each ground connection; corrosion can quickly impede conductivity.
Use a multimeter to test the continuity between the grounding points and the negative battery terminal. A reading close to zero ohms indicates a good ground. If resistance is present, clean the connection surface and re-tighten. Remember that inadequate grounding can cause erratic electrical behavior and prevent circuits from functioning correctly, so meticulous attention to detail is crucial.

Advanced Considerations
EZ Wiring harnesses exhibit compatibility with GM systems, and modifications are possible for custom builds, demanding careful planning and electrical expertise for success.
Understanding GM Harness Compatibility
EZ Wiring harnesses are fundamentally based on General Motors (GM) wiring schemes. This design choice offers broad compatibility, but necessitates understanding the differences when integrating into non-GM vehicles, like Fords. The harness arrives with numerous GM-style connectors; those not required for your specific application must be carefully trimmed and discarded.
Because of this GM foundation, adapting the harness often involves matching the EZ Wiring’s outputs to the unique wiring configurations of your vehicle’s switches – ignition, headlights, and wipers are common areas needing attention. A multimeter becomes an invaluable tool for verifying correct connections, especially when dealing with Ford’s differing standards. Thorough research and careful planning are crucial for a successful installation.
Modifying the Harness for Custom Applications
EZ Wiring harnesses provide a solid foundation, but often require modification for custom vehicle builds or unique accessory integration. The pre-labeled wires offer a significant advantage, allowing for easy identification during alterations. Extending wire lengths, adding connections for aftermarket components, or adapting the harness to non-standard layouts are common modifications.
Proper crimping and soldering techniques are essential when making these changes, ensuring reliable connections. Always refer to the EZ Wiring documentation and consider consulting online forums for guidance on specific modifications. Remember to maintain clear labeling of any added wires or connections to facilitate future troubleshooting. Careful planning and execution are key to a successful custom wiring setup.

Resources and Support
EZ Wiring provides detailed documentation, while online forums – like ClassicBroncos.com and Mustang Forums – offer valuable community support and installation advice.
EZ Wiring Documentation
EZ Wiring provides comprehensive documentation to guide users through the installation process. These materials typically include detailed wiring diagrams, component lists, and step-by-step instructions. The documentation emphasizes identifying each wire by its label, which appears at regular intervals along the harness.
Users should carefully review the documentation before beginning installation, paying close attention to the fuse block placement and main circuit wiring harness overview. The instructions often highlight the need for professional wiring expertise, particularly when adhering to national wiring standards and vehicle-specific circuits. While helpful, the documentation may require supplemental resources, like online forums, for clarification on vehicle variations.
Online Forums and Communities
Online forums, such as Mustang Forums at StangNet and ClassicBroncos.com, are invaluable resources for EZ Wiring Harness users. These communities offer practical advice, troubleshooting tips, and shared experiences from individuals who have completed installations. Forum members frequently discuss the “tricky” aspects of wire routing and the necessity of using a multimeter to verify connections, especially when adapting the GM-based harness to Ford vehicles.
These platforms provide a space to ask questions, share photos of installations, and learn from others’ mistakes. Users often report modifying the harness or purchasing supplemental components, like ignition switches, based on forum recommendations. Active participation can significantly streamline the installation process and resolve unexpected challenges.

Cost Comparison
EZ Wiring Harnesses typically cost less than Painless Wiring options; a Bronco harness was found for $145, offering a budget-friendly rewiring solution for enthusiasts.
EZ Wiring vs. Painless Wiring
When considering a full vehicle rewire, the choice often narrows to EZ Wiring and Painless Wiring. A key difference lies in price; EZ Wiring harnesses, like the Bronco-specific model, can be significantly more affordable, with examples found for around $145 delivered. Painless harnesses, particularly their “plug-n-play” options, generally command a higher price point, often exceeding $800.
However, the lower cost of EZ Wiring often comes with a trade-off. EZ harnesses frequently utilize a GM-based wiring scheme, requiring users to trim and discard unnecessary connectors to suit their specific vehicle – a Ford, for instance. Painless aims for more direct fitment, potentially simplifying installation, but at a premium cost. Ultimately, the best choice depends on budget, DIY skill level, and vehicle-specific needs.
Budget Considerations
Rewiring a vehicle with an EZ Wiring harness presents a cost-effective solution compared to some alternatives, but a complete budget requires careful planning. The harness itself can range from $145 to $200, depending on the vehicle application and vendor. However, this is just the starting point.
Additional expenses may include purchasing a new ignition switch (around $50-$100, as some original switches may be faulty), a multimeter for verification ($30-$80), and potentially new connectors or terminals. Factor in the cost of proper crimping tools if you don’t already own them. Labor costs should be considered if you aren’t performing the installation yourself. Thorough budgeting ensures a smooth and financially predictable project.

Safety Precautions
Always disconnect the vehicle’s battery before starting any wiring work. Use proper wire stripping and crimping techniques to ensure secure, reliable electrical connections.
Disconnecting the Battery
Prior to commencing any electrical work with the EZ Wiring Harness, completely disconnecting the vehicle’s battery is paramount for safety. This prevents accidental shorts, sparks, and potential damage to the new wiring or vehicle components. Begin by locating the negative (-) battery terminal. Using a wrench of the appropriate size, carefully loosen the nut securing the cable clamp.
Once loosened, gently remove the cable from the terminal, ensuring it doesn’t accidentally touch any metal part of the vehicle. Secure the disconnected cable away from the battery post to prevent accidental reconnection. Repeat this process for the positive (+) terminal. With both terminals disconnected, you’ve effectively isolated the electrical system, creating a safe working environment for your EZ Wiring Harness installation.
Proper Wire Stripping and Crimping
Achieving secure and reliable connections is crucial when installing an EZ Wiring Harness. Begin by using a wire stripper tool appropriate for the wire gauge. Carefully strip approximately 3/8” of insulation from the wire end, avoiding nicking or damaging the conductor itself. A clean strip ensures optimal contact within the crimp connector.
Next, insert the stripped wire fully into the correct size crimp connector. Utilize a quality crimping tool, designed for automotive applications, to firmly crimp the connector onto the wire. A proper crimp will create a gas-tight seal, providing excellent conductivity and preventing corrosion. Always test the crimp by gently tugging on the wire; it should not pull out of the connector. Poor crimps lead to intermittent connections and potential failures.